To Flip or Not to Flip
'Flipping the mount' as it reaches the meridian is a common requirement
amongst German Equatorial Mounts. It may seem a relatively trivial operation
for the fortunates who have a permanent observatory set-up with neatly manicured
cabling everywhere, but for the unfortunate 'mavericks' amongst us who of
necessity do their imaging of the stars in remote places actually under the
stars, it can be quite a chore, involving the following steps:
- stop the imaging sequence
- warm up and disconnect the camera (because most often cables will either
tangle or not reach after flipping)
- flip the mount
- rotate the camera through 180°
- re-connect and cool down the camera
- re-centre the object
- re-acquire the guide star
- re-calibrate the guide star
- finally, re-start the imaging sequence
During the above process at least 15 minutes (and sometimes up to 30 minutes) of valuable imaging time will have been lost, even if re-focusing is not necessary. Also it is hard to repeat the exact alignment after rotating the camera, which means there will usually be rotation between the image sets, reducing the FOV.
A great advantage of Astro-Physics mounts is that they can track through the meridian. This means that an imaging sequence can often be started with the telescope well to the east of the mount (and under the mount, with the weights above the mount). As the mount tracks it will cross over to the 'right' side of the mount, as it crosses the meridian. This means (for example) that an entire five hour imaging sequence can be completed without ever having to stop and flip the mount. With this capability an Astro-Physics mount can maximise both imaging time and personal sleep time during the imaging sequence!
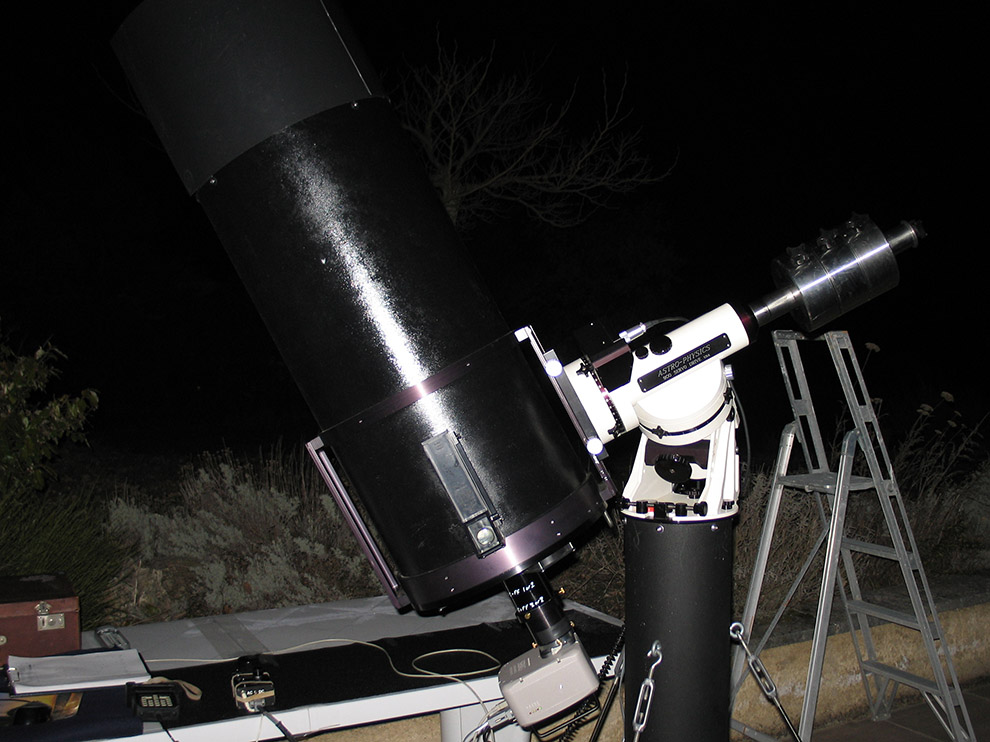
Consider the following image:
 |
|
This picture shows the mount at the start of the 5-hour M51 imaging sequence. The telescope is slewed as far to the east as possible without colliding with the mount. By starting in this position the mount can track without interruption for as long as desired or until the object becomes too low in the west. (the ladder in background is to check for any dew on optics between image sets) |
 |
|
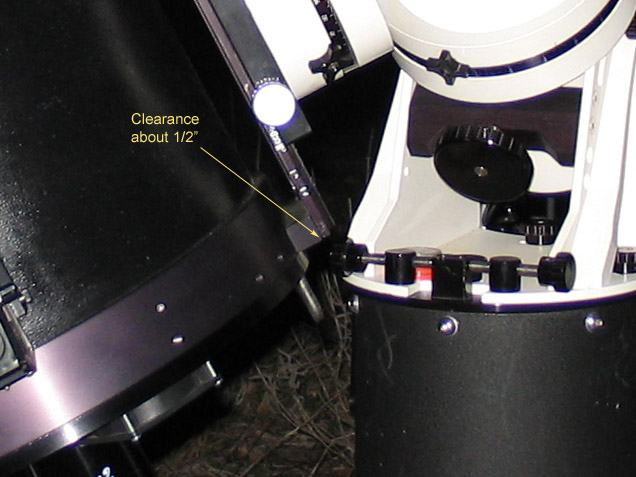
This enlargement shows just how close! Difficult?.. no, easy with just three common sense precautions (see below). |
Meridian Delay
Astro-Physics mounts have a superb feature called 'Meridian Delay' which enables
the mount to slew to objects on the 'wrong' side of the mount, as in the above
photo. There is a great advantage to this, as described above. Of course,
not all objects can be reached in this way - there are two primary determining
factors: the length of the OTA / CCD camera combination, and the declination
of the object being reached. Generally, the shorter the OTA and the further
south the object (towards the celestial equator) then the further east the
mount can go, and vice versa. In fact when imaging objects in the southern
Milky Way with the small Tak FSQ-106, I can start the imaging sequence with
the object close to the eastern horizon and track continuously until it is
close the western horizon - wonderful!
Some Care is Needed...
Obviously some care is needed when slewing to objects on the 'wrong' side
of the mount, because the telescope / camera combination can strike the mount.
But it is not hard to avoid this - in more than a decade of using the AP 900GTO
I have never once struck the mount. Here are three common-sense precautions:
- Set the slew speed to the slowest setting (600). This gives more time to respond and stop the mount if the telescope gets too close. Unless I am 'showing off' to somebody I always use the 600 setting - it just makes sense and the extra few seconds in slewing to objects is completely inconsequential.
- Never start a slew unless your headlight is shining directly on the mount and you are watching closely!
- Never start a slew unless your thumb is poised over the STOP button, ready to stop the mount immediately if the telescope gets too close.
Even in the unlikely event you do strike the mount it is unlikely to do any damage. The most likely thing to happen is that the AP mount clutches will slip and the component that collided will receive no more than a superficial blemish. But... I suppose it is (very rarely) possible for major damage to occur if all circumstances (including reasonable care) are against you. In this case please be prepared for the unpleasant knowledge that neither myself nor Astro-Physics will be in any way answerable - you do this entirely at your own peril! Life is fun isn't it?
Joking aside, the AP is a fabulous mount - just use it to its full capacity and with a modicum of care - as you would always do with a precious object - and nothing will go wrong.
Back to Basics
I have owned an Astro-Physics AP 900GTO for more than 10 years. Almost all
of the images on this site were taken using this mount. It is a very fine
mount, arguably the finest amateur / semi-professional mount in the world.
I have always taken this mount at face value and have used it 'as it comes'
- in normal circumstances it needs no 'add-ons' at all to do its very best.
But over the years I have become surprised by the large number of 'fix-ups',
'add-ons', and 'gizmos' that are commonly added to this mount. Some of this
may indeed be necessary with an inferior mount but for a mount like the AP
it is often redundant and seems in many cases to divert attention from the
fundamentals of imaging. This view in no way detracts from the the great skill
of the developers and the excellence of the solutions - the only point is
that they seem to be widely used with scant regard for their efficacy and
for no better reason than it's a 'new fad' and 'everyone is using it', and
are thus often misapplied. These are my thoughts about some of the things
I have encountered, but by no means all I am sure:
Periodic Error: on my mount it is completely untrained. No PEM, no PEMPRO, etc... PEMPRO may be important if doing completely unguided imaging, but if autoguiding then simply forget about it - it is an irrelevant consideration with an AP mount. There seems to be a common obsession with the amplitude of PE but this is not the most important consideration for autoguiding (though it is very low on AP mounts) - it's the smoothness of the excursions! With an AP mount such small excursions as exist are so smooth that they are barely perceptible to the unaided eye and well within tolerance for high precision autoguiding.
Pulse Guide: well, I am sure it's useful for tracking asteroids, comets, etc, but if it's a fix up for a mount error or bad polar alignment then it will always be much better to fix the mount and polar align properly. Seeing deflects a star image far more rapidly than an AP mount ever will. Tracking comets or asteroids is actually very easy without having to physically track the thing at all - see here for an example.
PoleAlignMax: I suspect that I polar align a lot more than most. I alternate between two imaging locations up to four times per year. All of my equipment takes the 1600 mile return trip and I set up and polar align for each location. Thus I polar align up to eight times per year, and it has to be very accurate. I can think of no reason to discontinue my preferred Drift Method of polar alignment. It is intrinsically highly accurate because it is a 'forced' mechanical alignment of the physical components of the mount. It has no reliance at all on pointing accuracy, orthogonality of the optics, computer interaction, time setting of the mount, or anything else. It can be used on any mount - it works just as well on a mount with no pointing ability at all.
Plate Solve: Orthogonality problems? Bring it on! I have three very different telescopes, all with different cradles. If I were to try to achieve repeatable orthogonality with all these telescopes it would be a nightmare and a complete diversion. Note that orthogonality is only a (potential) issue if and when you have to flip the mount. Since AP mounts enable much more imaging with much less flipping, orthogonality is much less of an issue. Of course, targets are usually off by a few arc-minutes on the relatively few occasions when I do have to flip the mount, but it's a really simple and quick process to re-centre the object and press the ReCal button. Why solve a problem that doesn't exist?
Ascom: it all sounds wonderful and I'm sure would be very useful if I were a professional astronomer, but as an amateur astronomer I cannot think of anything more boring than to be sat in a remote place behind a computer screen clicking mouse buttons in order to do my astronomical imaging. It wouldn't work for me as I would be in a constant state of nervous exhaustion from the thought that my precious mount and telescopes were subject to damage invisibly through all manner glitches beyond my control. I have also read reports of remotely controlled telescopes twirling uncontrollably around an observatory, crashing into things and wreaking havoc with valuable equipment. Not my idea of fun. Not long ago I went out to inspect the image downloads, as I regularly do, and discovered that the last downloaded image was slightly blurred. I could not think of a reason. The sky looked fine. The mount looked fine. But on looking down I discovered that a giant toad was trying to get friendly with one of the portable pier legs. Is there an Ascom driver to take care of that? Wherever possible, I think it's much more fun to be close to the telescope, under the wondrous stars.
You can save a lot of time and trouble and simultaneously achieve the best possible results. Unnecessary fix-ups, add-ons, and gizmos can not only be irrelevant but divert time and energy from the precision imaging of which the mount is intrinsically capable. If you want to test the validity of what I say please feel free to check some of my images, all of which were taken with the mount in its pristine factory default state - the only accessory being an autoguider! These are some recent examples: M101, M51, NGC 3718, M64, M1, Horsehead Nebula. All of these are 'toughest test' images, taken with my longest focal length instrument (RCOS 12.5") on the AP 900 GTO - it is much easier to achieve good guiding precision with shorter focal length instruments.