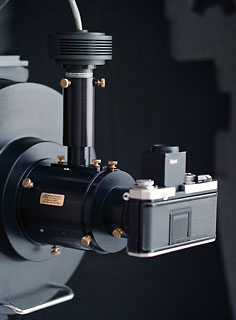
 The techniques described in Sections 5, 6, and 7 are based around the
following equipment (also seen in the photo to the right):
The techniques described in Sections 5, 6, and 7 are based around the
following equipment (also seen in the photo to the right):
This is a description the techniques that I use to guide my LX200 10" f/10 for long exposure astrophotography. It is organised into the following sections:
1. Introduction
2. Guiding Concepts (for the new user)
3. Guiding Systems (for the new user)
4. Guiding Equipment
5. Viewfinder Composition and Guide Star Acquisition
6. Autoguider Setup and Focusing
7. ST-4 Tips / AnomaliesSections 2 and 3 discuss guiding generally and are aimed at the new user. Sections 4 through 7 describe the techniques that I specifically use. This is explained in more detail in the Introduction, below. For those readers in a hurry, the real substance of the article is contained in Sections 5 and 6.
References:
To supplement to this article readers are encouraged to refer to the following further articles:
- Instructions And Tips For Using the ST-4 Autoguider an excellent article on the ST-4 by James Janusz, which is presented on this web site with Jim's kind permission. This article is referred to again in Section 6.
- Lumicon Giant Easy Guider - a comprehensive description of the GEG with images, presented on this web site by the author.
- LX200 Polar Alignment Procedure - a detailed description of the drift method of polar alignment as applied to the LX200, presented on this web site by the author.
- Experiences with the ST-4 for Autoguiding - one of many fine articles on the web site of Chuck Vaughn.
The concepts described should be equally applicable to other equipment of the same type, albeit with some loss of functionality in certain cases. When I started writing this article I had in mind to make it applicable to all types of guiding, however it quickly emerged that to do this in a reasonably concise and clear way it would need to be limited to a discussion of general concepts. What I really wanted to present was a set of specific instructions, therefore I chose to base the techniques around the equipment that I actually use. This is not necessarily a limiting factor, because by happy coincidence the combination of SCT, GEG, and ST-4 is being used, or has been used, by a large number of the most proficient and experienced astrophotographers in the world today.
Astrophotography is one of the most demanding areas of photography in terms of image quality. Stars should be portrayed as tiny points of light and when they aren't, it shows up horribly. Achieving perfect star points requires tremendous precision - no matter how perfectly the telescope is polar aligned and no matter how perfect the construction of the mount, no commercial telescope in existence can track the sky with sufficient accuracy for anything but the very shortest of exposures. To achieve sufficient tracking accuracy, the tracking system of the telescope needs constant corrections. This is done by selecting and aligning a chosen guide star to a preset position, and whenever it veers from this position, issuing corrections to the telescope mount to drive the telescope to precisely the initial position.
In the past all telescopes were guided manually - in other words, the guide star was aligned to an illuminated reticle in an eyepiece, and corrections to the telescope drive were made manually by the observer. With the advent of CCD imaging devices, an automatic form of guider (autoguider) has become possible. A CCD camera takes images of the guide star and compares the current guide star position with its initial position. Whenever it veers from this position, the autoguider sends signals to the telescope mount to drive the telescope back to the correct position.
Two distinct systems are used for acquiring the guide star image: the Guidescope, and the Off-Axis Guider (OAG).
Guidescope
The guidescope is a dedicated telescope (almost always a refractor) whose sole purpose is to image the guide star. It is normally clamped firmly to the main imaging telescope so that the optical plane of the two telescopes is parallel. For this system to work it is essential that there is no possible movement or flexure in any part of the optical systems of either telescope, or between the two telescopes. For this reason guidescopes are suitable for use with some types of telescope and not with others:Refractors: Guidescopes can work very effectively with refractors since all of the optical components are usually firmly mounted and immovable. However flexure can still be a problem between the guiding refractor and the imaging refractor, and sometimes it can take a lot of effort to resolve these problems. The use of high quality mounting rings is the best method of ensuring that such problems do not arise.
Newtonians, Cassegrains: Guidescopes can often work effectively with Newtonian and traditional Cassegrain designs where all of the optical components are firmly mounted and flexure free. However sometimes flexure problems can arise from the main tube, the spider, or the mirror mounting system. When these sort of problems occur they can be very troublesome to resolve. Some of the most experienced astrophotographers do not not advise using a guidescope with these designs, although some others use guidescopes with Newtonians quite successfully.
Schmidt-Cassegrains (SCTs): The SCT has, as a fundamental part of its design, a moving mirror system. An SCT cannot operate as an SCT unless its main mirror is able to move freely. Since the telescope is moving the entire time that an exposure is in progress, the centre of gravity of the mirror changes constantly and it is inevitable that it will shift during an exposure. The amount and timing of such shift cannot be predicted - all that can safely be predicted is that the longer the exposure, the more likely it is that the mirror will shift. The consequence is that, for high quality, long exposure astrophotography, a guidescope cannot be used successfully with an SCT. The worst scenario of all is to use a small Maksutov-Cassegrain (such as the Meade ETX) as the guidescope for an SCT. Here, one moving mirror system is trying to guide another moving mirror system, and the situation is obviously hopeless. If the objective is to take high quality long exposure astrophotos, then the user should not attempt to use a guidescope mounted on an SCT. Instead, an OAG should be used (see below).
Off-Axis Guider (OAG)
The fundamental difference between an Off-Axis Guider and a Guidescope is that the OAG works by picking off part of the light cone of the main imaging telescope. Thus it is does not rely on a separate optical system, but uses the optics of the imaging system to produce the guide star image. In practice the OAG is an assembly that fits between the telescope and the camera, the active part of which is a small prism that picks off part of the periphery of the light cone and angles it perpendicularly through a drawtube, at the end of which is normally situated a reticle eyepiece or an autoguider.Because the OAG uses the same light cone as the imaging system it will work successfully with any kind of telescope, including SCTs. With a high quality OAG system, flexure problems disappear completely. In his article on Guiding Options Brad Wallis says: "OFF-AXIS GUIDERS: The friend of the novice astro-photographer". However there are some disadvantages to using an OAG:
- Because the OAG uses the off axis light cone, star images can be soft and fuzzy compared to on axis images. This means that guide stars will appear fainter and possibly limit the choice of usable guide stars.
- Only stars within a certain radius of the object being photographed are usable as guide stars and in certain sparsely populated star regions this may make it difficult to find a guide star.
The above factors mean that many amateurs have opted for a guidescope if they have the kind of telescope where this choice is available. On the other hand, OAGs do work very successfully and the oft perceived difficulty in finding guide stars may be caused more by inexperience than any real limitation with OAGs. In more than 3 years of experience in using the Lumicon GEG I have always been able to find a usable guide star within about 5 minutes at most - usually it takes far less time. Also it is worth noting that OAGs are the only system used by the most skilled and successful amateur astrophotographers with their SCTs. OAGs are by no means only for novices, and bear in mind that they are the only viable guiding system for several types of telescope, whether you are an experienced or a novice user.
In summary, guidescopes yield crisp, bright guide stars, which are usually easy to find, however guidescopes are not suitable for use with some types of telescope. OAGs may be used with any type of telescope, and are the only viable guiding system for several types, however guide star brightness may sometimes limit the choice of available guide stars, and the narrow field may sometimes make it difficult to find a guide star.
From this point forwards, this article describes the techniques that I specifically use to guide my 10" LX200. This section describes the equipment that I use.
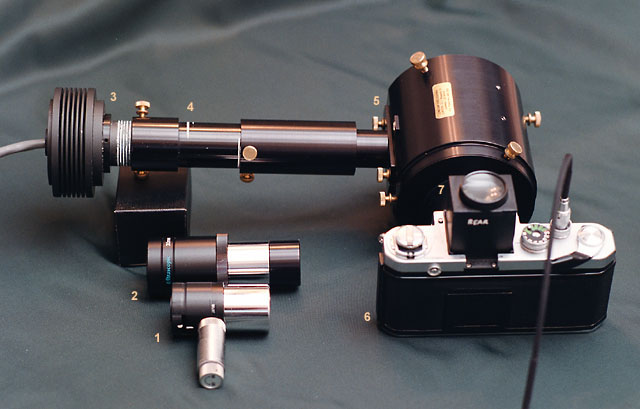
The above photograph illustrates the equipment that I use for autoguiding. The numbered descriptions which follow refer to the numbers in the photograph.
- 12.5mm illuminated reticle eyepiece for centering a chosen guide star prior to insertion of ST-4 head.
- 30mm wide field eyepiece used for locating a suitable guide star from amongst a field of stars.
- ST-4 CCD head shown inserted into the guide tube extender. The ST-4 control box is not visible in this photo, however the front panel layout can bee seen under Section 6: Autoguider Setup and Focusing.
- Lumicon 1.3" - 4.5" guide tube extender. Notice the white focusing line (close to the two thumbscrews) which marks the 3" extension required in the f/7.5 mode of the GEG. Notice also the white focusing mark further up the extender (under the '4'), which marks the extension required in the f/5.8 mode of the GEG. In the f/11.2 and f/5.5 modes of the GEG this extender tube is not required.
- This is the main Giant Easy Guider (GEG) component with standard 4" guide tube attached - this is shown rotated 90 deg CCW (for illustrative purposes).
- Nikon F2 camera body fitted with Beattie Intenscreen (not shown) and direct screen viewer in place of the prism head.
- Home made 6x magnifier / direct screen viewer. This is the equivalent of the Nikon DW-2, however the home made version works exceptionally well and is very light, so that it can be kept in place permanently during the exposure. I also have a home made 14x direct screen magnifier (not shown) which is used for focusing.
The f/7.5 configuration shown above may appear somewhat extreme due to the degree of guide tube extension. It was chosen because it nicely illustrates all of the components, but it is by no means uncommon to use this configuration in practice. Sometimes I have been asked if the GEG is subject to flexure with this degree of guide tube extension. The answer is no - I have taken many astrophotos using this configuration (all of them are shown on this web site) and none of them has shown any sign of flexure. The secret is in the design and the quality of the components of the GEG.
The photograph to the right shows the light-facing view of the GEG, showing the pick-off prism, and behind that, the focal reducing lens of the GEG in the 'rear' position. With the lens in this position, the focal ratio of the 10" LX200 is reduced from f/11.2 to f/7.5. The pick-off prism is excellently designed and does not produce any discernible prism shadow. Also can be seen the sets of thumbscrews to the front and rear which allow the camera and GEG to be independently rotated to achieve optimum photographic composition.
Parfocal Offset: The concept of the parfocal eyepiece does not seem to make too much sense when using an OAG system. The idea behind the parfocal eyepiece is that you slot in the parfocal eyepiece up to the parfocal stop and then adjust the telescope focus until the guide star is focused in the eyepiece. Then you replace the eyepiece with the autoguider, again up to the parfocal stop, and the autoguider should be in perfect focus. However, you do not have the ability to adjust the telescope focus when using an OAG, since this has already been preset for the camera. Instead, the autoguider must be focused by positional adjustment within the eyepiece drawtube. In
practice, focusing the autoguider can be made simpler by drawing concentric rings around the nosepieces of both the eyepiece and the autoguider, which provide offsets from the focus points on both (see the illustration to the left).
It works as follows: the focus point of the eyepiece is noted by reference to the marker ring which is nearest the end of the drawtube. Then the autoguider is inserted up to the marker ring which coincides roughly with the offset required for the eyepiece. I call this the 'Parfocal Offset'. The autoguider will still need to be accurately focused, however the use of a Parfocal Offset should be sufficient to ensure that a brightness reading can be obtained as soon as the autoguider is inserted.
This section describes the step-by-step technique that I use for guiding astrophotos. The description is based on the equipment that I use (see the previous section) however with some adaptation it may be applied to other equipment of the same general type. Those users doing manual guiding may find this description complete in itself. Those users using an autoguider should also refer to the following section.
1) Acquire and compose the object you wish to photograph in the camera viewfinder. It will help greatly if you locate the object you wish to photograph with HP mode enabled (the reason will be become apparent). Adjust the telescope focus until stars in the camera viewfinder are are in approximate focus (this is not a critical adjustment, that will come later)* Compose the object in the camera viewfinder as accurately as possible by making fine adjustments to RA and Dec on the LX200 keypad. Rotate the camera with respect to the GEG as necessary to achieve perfect composition.**
* If there are no bright stars visible in the camera viewfinder, then simply press Goto on the LX200 keypad. The telescope will slew to a bright locator star which is perfect for focusing. Centre the star in the viewfinder, then focus. Then press Goto again, and the LX200 will slew back to the exact centre of object you wish to photograph - note that this elegant method of finding a focusing star will only work with HP Mode enabled!
** I always compose the camera viewfinder frame using Megastar and print out the chart. I have the chart next to me when composing the object - I match the stars I see in the camera viewfinder to those in the Megastar chart.2) Locate Guide Star. Place a wide field eyepiece into the OAG drawtube. For example, I use a 30mm Ultrascopic (from Orion). Adjust the focus of the eyepiece by adjusting it vertically in the drawtube. You should immediately see some stars in the FOV, although possibly too faint for comfortable guiding. Further refine the focus until the stars are sharp. The next step helps you to select the best possible guide star.
Slightly loosen the thumbscrews that hold the GEG to the telescope and rotate the GEG with respect to the telescope while looking for guide stars through the eyepiece. You can rotate the OAG fully 180 degrees between the declination axis mounting points, or even beyond if you wish. You are looking for a moderately bright guide star that is as close as possible to the centre of the FOV in declination.* Once you have found an optimum guide star, roughly center it in the eyepiece FOV by making rotational adjustments to the GEG body, and by making radial adjustments to off-axis drawtube (slightly loosen the thumbscrews and slide the drawtube up or down along the length of the GEG body).
* Some amount of trial an error is inevitable in selecting guide stars - too bright, and the autoguider will not guide with optimum accuracy - too dim, and you may be unable to achieve the required brightness level from the autoguider. After some experience you will soon be able to select stars visually that work well with the autoguider.
3) Centre Guide Star. Next, replace the wide field eyepiece with an illuminated reticle guiding eyepiece in the GEG drawtube. I use an Orion illuminated reticle 12.5mm Plossl, which works very well.* Focus the guiding eyepiece by adjusting its position in the GEG drawtube (do not adjust the telescope focus). Then refine the centering of the guide star in the eyepiece reticle by making small rotational and radial adjustments to the GEG. At the conclusion of this step, firmly lock all of the relevant GEG thumbscrews.
* Frequently the Meade 9mm seems to be used - in fact this much magnification is quite unnecessary for the purpose described here, and may even make the process harder.
4) Refine Composition and Focusing. Go back to the camera viewfinder and refine the composition and focusing. Assuming that you rotated the GEG in Step 2, you will need to re-adjust the camera rotation (wrt the GEG) so that the composition is restored. Next, refine the camera focusing.
Press Goto on the LX200 keypad. The telescope will slew to a bright locator star which is perfect for focusing. Centre the star in the viewfinder, then focus the star as accurately as possible by adjusting the telescope focus. When you focus, you are looking for the smallest possible size of the star image. You may see spikes or other artefacts caused by the camera focus screen, but ignore these. Ensure that you do not touch the telescope focus after this. Press Goto again, and the LX200 will slew back to the centre of object you wish to photograph.
Since in Step 1 you may have offset the telescope from the object centre to achieve optimum composition, you may need to go back to the guiding eyepiece and make small RA and Dec adjustments to ensure that the guide star is centered in the reticle. In any event, at the conclusion of this step, you should make sure that the guide star is centered in the reticle eyepiece.
If you are guiding the telescope manually then you are now ready to open the camera shutter and start guiding. If you are using an autoguider then keep the reticle eyepiece in place in preparation for the next step.
The procedure described below assumes an ST-4 autoguider (see right for front panel layout), however the underlying process should be applicable to other autoguiders. This description is not intended to replace the ST-4 manual in any way, and assumes prior knowledge of the ST-4.
In addition, the reader is advised to refer to the excellent article: "Instructions And Tips For Using the ST-4 Autoguider" by James Janusz, which is presented on this web site with his kind permission.
The procedure in this section follows immediately from the preceding Step 5: "Camera Composition and Guide Star Acquisition" and assumes that it has been completed.
1) Determine N/S Axis. This step enables you to determine the North / South plane of the off-axis FOV prior to insertion of the autoguider. If you have completed the previous procedure you should have a suitable guide star centered in the reticle of the guiding eyepiece.
Now select Center speed on the LX200 keypad and alternately press the N and S buttons. Closely observe the direction in which the guide star moves. In your mind, extrapolate that line of movement until it 'strikes' some part of the telescope mount that will be a useful reference point - such as the fork base, the declination axis, etc. The direction of the N / S plane will depend on the degree to which the GEG was rotated in order to find a guide star. Once the reference point has been noted, re-center the guide star in the reticle.
Before removing the eyepiece, try to determine the Parfocal Offset (see the discussion under Section 4: Equipment Needed) - this will help in Step 3.
2) ST-4 settings. Prior to insertion of the ST-4 head, it is necessary to select the ST-4 settings you will use and to take a dark frame. The settings required for any given guide star can only be determined empirically - there is really no short cut for this. However after some experience you will be able to quite accurately estimate the correct settings for a guide star based on its visual brightness. Of course, other ST-4 settings are not related to guide star brightness and do not need to be estimated.
Here is a good starting point: Using a typical guide star of magnitude of 10 / 11, and with the GEG in 'f/10' mode, I typically use the following ST-4 settings: EA = 2, B = 3, BA = F, SA = 10, FL = L, C1 = 5, C2 = 5, H1 = 0, H2 = 0, AA = 1, AL = 4
Of course, it all depends on the brightness of the star, but try these values as a starting point - more information can be found on ST-4 settings under Step 5.
Having selected the ST-4 settings, place the black cap on the ST-4 nosepiece, and take a dark frame.
3) Insert and Orient CCD Head. With the guide star still centered in the reticle eyepiece, replace the eyepiece with the autoguider head. Orient the ST-4 head such that the Dec (Y) axis, when extrapolated, 'strikes' the same reference point as noted under Step 1 (above). Insert the ST-4 head as far as the Parfocal Offset position noted under Step 1.
4) Acquire and Focus Guide Star. On the ST-4, press the Find and Focus key. With luck, you should immediately get brightness readings from the guide star. Check the X and Y readings - you are looking for something close to 50/50, which is the centre of the CCD chip. If the readings are way off then press the relevant X or Y keys on the ST-4 to bring the guide star closer to the centre.
If you do not get brightness readings at all then you will need to refine the focus position of the CCD head. Make small changes by adjusting the depth of the CCD head in the guider tube. After each adjustment let the telescope stabilise for around 10 seconds before looking for new brightness readings. As soon as you get brightness readings you will need to refine the focus.
Focusing is a very important step - be patient to ensure that you have optimum focus - sometimes I spend 10-15 minutes on this one process. Adjust the depth of the CCD head by small increments (using the focus rings as a reference) and note the brightness reading with each change. Ensure you have the optimum focus point by seeing diminishing brightness readings on either side. Once you get close to the optimum point make smaller adjustments until you have the very highest brightness reading.
At this point, lock down the drawtube thumbscrews and carefully note the focus position against the calibration rings.
5) Refine ST-4 Settings. Having achieved optimum focus of the ST-4, and having noted the exact focus point, you now need to check that the brightness reading is within an acceptable range. If you have Faint Mode enabled (such as suggested in Step 2), then you should be looking for brightness readings in the range of 8 - 16. Do not go higher than about 16 with Faint Mode enabled. If you are using Normal Mode then brightness readings up to about 50 are acceptable, however try to keep brightness readings as low as possible because the ST-4 guides more accurately on faint stars. Most often I guide with a brightness reading in the range of 8 - 12.
If your brightness readings are outside this range then you will need to adjust either the Exposure Adjust, Boost Level, or Brightness Adjust until the brightness reading is brought within an acceptable range. Whenever any of these three parameters are adjusted, a new dark frame must be taken. I find it easiest to do this by removing the CCD head and placing the black cap on the nosepiece. The CCD head is then replaced at exactly the previously noted focus position, and with the head oriented correctly against the reference point (Step 3).
I find that guiding works best with the LX200 when the frequency of tracking corrections is around 2 -3 seconds. This means an exposure setting of either 2 or 3 seconds, so Exposure Adjust is the parameter I least like to alter. However if you need to reduce the exposure, you can increase averaging to compensate. For example, if EA needs to be reduced to .5 sec, you can increase AA to 4 and achieve nearly the same result as a 2 second exposure. Faint Mode also works well with the LX200, so I prefer to leave that enabled. The parameter that can most readily be changed is Boost, and there are 4 levels to choose from. If after changing all three parameters you still cannot get the brightness reading within an acceptable range, then you will need to select another guide star. However this is rarely necessary once you gain some experience with the ST-4.
As a final step, check that the orientation of the CCD head is sufficiently accurate. You do this by offsetting the mount in one axis and noting the positional change of the guide star in other. Firstly, set the ST-4 to Find and Focus mode and center the guide star on the CCD (press the X and Y keys until the X and Y coordinates read close to 50/50). Then press either the E or W key for a sufficient amount of time to record a change of about 30 units in the X display. Note the reading in the Y display. Perfect head orientation means that no change will be recorded in the Y display. With any luck, the change will be less than 2 or 3 units, and the head orientation will be sufficiently accurate. If the change is more than this, you should make small rotational adjustments to the CCD head to orient it more accurately. After each adjustment, ensure that you have maintained the correct focus position of the head. Note that this step is not essential, however it will definitely help the ST-4 to track more accurately. At the conclusion of this step, re-center the guide star to 50/50 in preparation for the next step.
6) Calibrate ST-4. Prior to calibrating the ST-4, set it to Find and Focus mode and center the guide star on the CCD (press the X and Y keys until the X and Y coordinates read close to 50/50). Press the 'Calibrate Drive' key and the ST-4 will go through the calibration process. Both before and during the calibration process it is essential that you do not touch the telescope in any way, and ensure that it is not subject to any vibrations. Assuming that the calibration process was successful, the ST-4 will return with the 'Hello' display. At this point you are ready to start tracking. See below for some important notes to ensure success in this process.
7) Start Tracking / Start the Exposure. Before pressing the Track key, you may want to perform the fix for the '50% Star Brightness Problem' (see below under ST-4 Tips). After pressing the Track key, let the ST-4 cycle for 2 minutes or so, before opening the camera shutter. The ST-4 tends to settle into a rhythm during the first few minutes of tracking. During this time, closely observe the X and Y corrections and try to understand what is happening. Make sure you are comfortable with the way that the ST-4 is tracking. If anything seems amiss, now is the optimum time to correct it. Once the ST-4 is tracking happily, then gently open the camera shutter. During the exposure, take all steps to ensure that the telescope is not subject to any vibrations and that the air is kept as free of thermal disturbance as possible. During the exposure, I observe the following:
- Never approach the telescope closer than about 3 feet.
- Walk softly in the vicinity of the telescope, to avoid ground vibrations being picked up.
- Never pass in front of the OTA, since thermals from a warm body (especially in the cold night air) can reduce image quality and tracking accuracy.
This section contains a few tips on using the ST-4 that have proven to be a real benefit for me. It is by no means intended to be a set of instructions on using the ST-4. For this, please refer to the ST-4 manual, and the article by James Janusz: Instructions And Tips For Using the ST-4 Autoguider
1) Abort on 50% Star Brightness. There is a design feature of the ST-4 that causes it to suspend tracking if guide star brightness declines to 50% of its initial value. The design principle behind this is probably sound, however the problem is that several conditions can cause this to happen, either temporarily or permanently, and by no means all of them are sufficiently serious that they should warrant a cessation of tracking:
- Passing light cloud
- Temporary vibration of mount (e.g. wind gusts)
- Poor seeing: brightness can vary substantially owing to scintillation effects. If initial brightness was registered during a brightness peak then 50% reduction can easily be recorded during tracking especially if combined with other effects
- General reduction in transparency
- Object nearing western horizon
Even though the brightness may have declined by 50%, in most cases it will remain perfectly adequate for precision tracking. In some cases such a reduction may lead to impairment of the image, but even so there are circumstances where the user may wish to continue tracking (it may be a test exposure in which the conditions that led to the brightness reduction have no material impact on the test). But there are other transient conditions (such as noted under 1 - 3 above) where such a reduction should lead to no material impact on the quality of the image. In other words, there are many cases where the user would like the ST-4 to continue tracking despite a reduction in guide star brightness.
It is good that a guiding threshold exists, otherwise if the guide star brightness declines too much, it is possible for the ST-4 to confuse the star with the background noise. It is better that the ST-4 stops tracking rather than guiding on random background noise. But in more than three years of experience with the ST-4 I have found the 50% threshold to be too high - there are too many conditions that can cause a cessation of tracking, albeit temporarily in many cases. This is especially true when using long focus scopes, where the effects of scintillation are magnified. Here is a workaround:
The fix is to purposely lower the guide star brightness at the start of tracking, when the ST-4 initially registers the brightness. The apparently obvious way to do this is to partially obscure the front of the telescope, but in practice I have found it very hard to get satisfactory results this way. A better method is to set up a slight vibration in the mount. The idea is not to jar the mount, but to set up a continuous train of light vibrations that fuzz the guide star slightly. This can be done by lightly 'scratching' or tapping the mount with a rapid but gentle action. I commence the vibration sequence about 2 seconds before pressing the Track key, and continue it until the ST-4 has issued its first correction. This can work well provided that the right technique is employed - it may need a bit of practice.
2) SA Misnomer. There is one function of the ST-4 that is guaranteed to confuse the new user. It is the 'Scintillation Adjust' [SA] parameter. I believe that it is confusing because it is a misnomer. The name 'Scintillation Adjust' strongly implies that it is something you adjust in order to control sensitivity of the ST-4 to star scintillation. The SA function does not do that at all. It actually controls the degree to which the ST-4 dynamically adjusts the calibration values that it learned during the Calibration Adjust process and it does nothing to ameliorate the effects of star scintillation on guiding accuracy.
The fix is to rename this parameter, in your own mind, to the 'Dynamic Calibration' Adjust [DC] parameter. Providing that you always remember SA as actually being DC you will better understand this function. This parameter provides a means for the ST-4 to improve tracking by dynamically 'fine tuning' the values that determine how much correction it gives for any given error. For example, if the ST-4 finds that it is constantly over or under shooting then it can dynamically modify the relevant calibration value. The values (in pixels) that are input to the SA parameter determine the threshold at which it starts this dynamic correction process. A value of 1 means that it will dynamically correct when an error of 5 or more is recorded (1 pixel equals 5 error units). A value of 2 means that it will dynamically correct when an error of 10 or more is recorded, and so on. However, use this parameter with caution - there are two things that will definitely confuse the dynamic correction process:
- Poor seeing (bad atmospheric turbulence)
- Poor quality mount (that has bad slop or backlash)
If either of these conditions exist, then set SA to a high value. For example when using an LX200 mount under anything but good seeing conditions, it is best to disable the dynamic correction, by setting it to a value of 10 (this is the value that I most frequently use)
3) Faint Mode. Faint Mode is a setting of the Brightness Adjust [BA] parameter. Most ST-4 users set this parameter to A (for Average), however the F (for Faint) setting uses a special algorithm to increase sensitivity to faint stars by about 1 magnitude. It does this by replacing each pixel value in memory with the sum of the 3 x 3 box centered on that pixel. This algorithm has a very beneficial side effect - it smooths the star image, which means that it also smooths out rapid movements of the star image due to air turbulence. Thus Faint Mode really does provide a scintillation smoothing function, unlike the Scintillation Adjust parameter! This nicely solves that chronic problem with long focus telescopes such as SCTs under anything other than excellent seeing conditions ... more often than not, the autoguider is guiding on the seeing rather than genuine star drift. A mount such as the LX200 cannot respond to rapid changes in movement (this is not an AO system!) and without a scintillation smoothing function, the result is trailed star images due to constant over or under correction. Furthermore, Faint Mode works very well with the soft, slightly distended off-axis star images typically produced by SCTs.After more than two years of experience with using Faint Mode I have found that it works tremendously well in improving guiding accuracy with the LX200 / GEG and it seems to be perfectly adapted to this combination. Rapid star movement due to air turbulence is substantially reduced, while genuine star drift still gets detected accurately. Tracking errors that are in the range of 7 - 9 without Faint Mode get reduced to 3 - 4 with Faint Mode enabled. The effect is dramatic.
A further consideration - because off axis star images are soft and fuzzy, their brightness is lower. This means that finding suitable guide stars can be harder. But Faint Mode boosts the brightness level significantly, which means that very faint guide stars can be selected. This makes it much easier to find guide stars, and the ST-4 works very well with faint stars. Generally I use a brightness levels of around 8 - 12 with Faint Mode enabled, but note that Faint Mode should not be used when the brightness level is more than about 18. With Faint Mode you really do need to use faint stars, which should be good news.
A caveat - I am only suggesting that Faint Mode be used with OAGs on SCTs under less than perfect seeing. There are several conditions in which Faint Mode may produce slightly inferior guiding and should not be used - generally, when a crisp guide star image is available, such as when using a refractor guidescope, especially when the guiding instrument is of short focal length, or in very good seeing conditions. Generally, when a crisp, stable guide star is available, I would expect Faint Mode to produce slightly inferior guiding.
However if you use an SCT like the LX200 and very rarely experience excellent seeing conditions, then you may expect Faint Mode to significantly improve guiding accuracy - it is perhaps the biggest single 'secret' I have stumbled across in my use of the ST-4.
|
|
|
|